Practical - No1
Parts and functions of the microscope, and using microscope to observe specimens.- Recognize the parts and understand the functions of a light microscope.
- Use the microscope in correct manner.
- Prepare wet mounts of live tissues or cells.
- Manipulate the microscope to observe specimens.
- Calculate the magnification of objects.
- Draw cells according to the appropriate size and the scale.
- Determine the actual size of cells
Materials and Equipments
- Simple light microscope with low, medium and high power objectives.
- Clean dry slides and cover slips.
- Beaker and watch glasses
- Water sample from paddy field , hey infusion, pond water sample, onion epidermal peel
- Paint brush and a razor blade
- Ptactical book
Use of Compound light microscope
A compound light microscope is so called because it uses light and both ocular and objective lenses to view the object
Identification of parts

1.Eye piece (ocular lens): Top most series of lenses through which an
object viewed
2.Body Tube: Holds nose piece at one end and eyepiece at the other
end ,conducts light rays
3.Nose piece: Revolving device that holds objectives
Objectives:
4 . Low - power objective – Holds 10* lens used to view
the object in greater detail
5 . Middle-power objective – Holds lens used to view the object
6 . High - power objective _ Holds 40* or 45* lens used to view
the object in even greater detail
7. Stage clips: Hold slides in place on the stage.
to view the object.
9.Mirror: Give optimum illumination to the object for clear viewing
10.Arm: Supports upper parts and provides carrying handle.
11.Stage: Holds and supports microscope slides.
12.Coarse adjustment knob: Knob used to bring object into
aproximate focus used only with low
power objective .
13. Fine adjustment knob: Knob used bring object into final focus.
14.Base: The flat surface of the microscope that rests on the table.
If your microscope has mechanical stage.
15. Mechanical stage: A movable stage that aids in the accurate
positioning of the slide.
16. Mechanical stage control knobs: Two knobs that are usually
located below the stage.
• One knob controls forward / reverse movement.
• The other controls right / left movement.
Focusing Microscope
Lowest power
- Turn nosepiece so that the lowest power lens is in straight alignment over the stage.
- Always begin focusing with the lowest power objective lens.
- With the coarse adjustment knob , lower the stage until it stops.
- Place a slide of the letter" e "on the stage, and stabilize it with the clips.
- If your microscope has mechanical stage , pinch the spring of the slide arms on the stage ,and insert the slide.
- Center the "e " as best you can on the stage. If your microscope has two control knobs located below the stage to center the letter "e"
- Again be sure that the lowest power objective is in place.Then ,as you look from the slide , decrease the distance between the stage and the tip of the objective lens until the lens comes to an autonomic stop or is no closer than 3mm above the slide.
- While looking into the eye piece , rotate the diaphragm to give the maximum amount of light.
- Slowly increase the distance between the stage and the objective lens, using the coarse adjustment knob, until the letter e or object comes into view,or focus.
- Once the object is seen,you may need to adjust the amount of light.To increase or decrease the contrast,rotate the diaphragm slightly.Practice having both eyes open when looking through the eye piece. as it greatly reduce eye strain.
How to observe the onion epidermal peel.
- Make thin epidermal peel of onion and place in water in a watch glass.
- Transfer section of onion peel into a drop of water on the center of a clean glass slide by using a fine paint brush.
- Hold the cover slip at the edge of the drop water , with the help of a mounting needle,and gently lower the cover slip, supporting with the needle onto the drop of water .Do not allow air bubbles to be trapped under the cover slip.
- Place the slide on the stage of the microscope and move the low power objective into position.
- Looking through the eye piece , move the slide to bring the object into position for study. adjust the mirror to give optimum illumination to the object for clear viewing.
- Use the coarse focus knob to get the immage as clear as possible.
- Study and note the structure visible.
- Rotate the bojective holder and bring the medium power into position. A djust rhe focus to get a sharp immage.
- Bring the high power into position.
- Use the fine focus knob to make the image sharp.
- Study and record what you observe under low , medium and high power.
- Observe the samples employing proper microscopic techniques.
- Demonstrate the determination of actual size of given cell and advice them to determine the size of a cell.
Observations


- Onion epidermal peel - [ 1 X EP X OL ]
- water sample from paddy field

Euglena -[ 1 X EP X OL ]
- hey infusion

Paramecium -[ 1 X EP X OL ]

Amoeba - [ 1 X EP X OL ]
Practical - No 3
Title - Use of electron micrograph to understand the structure of cellular components
Objectives
- Interprets the electron micrograph
- Identifies the cellular components as seen by electron micrograph
- Draws the cellular components accurately
- Determines the size of each cellular components
Materials and Equipments
- Electron micrograph of a bacterium cell
- Electron micrograph of an animal cell
- Electron micrograph of a plant cell
Instructions
Allow the students to observe the electron micrograph of a bacterial cell, an animal cell and a plant cell.
Students must be able to identify the organelles and their relative propotions
Observations


Practical No.5
Objectives
1.Use the microscope to identify major animal tissues
2.Makes suitable drawings of observed animal tissues as seen through
the microscope according to the scale.
3.Differentiates the animal tissues according to their characters.
Materials and Equipments
- Microscopes
- Prepared slides of epithelial tissues
smooth tissues
striated muscle tissue
cardiac muscle tissue
coonnective tissues
1.Allow students to examine the slides of each tissue under low,
medium and high power
2. Let students make suitable drawings to show the observed
characteristics of above tissue.
3.Instruct the students to record highlighting the identification
features of each tissue.
Epithelial tissues


Connective Tissue


Cartilege


Bones


Blood


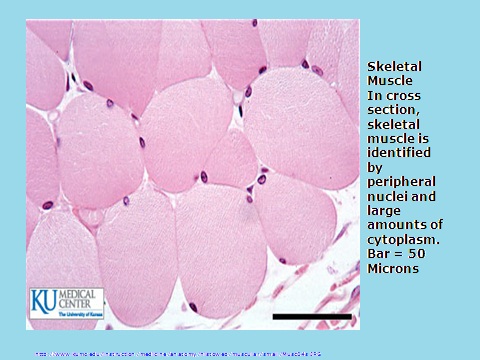
Muscular Tissue


Skeletal Muscle
Longitudinal skeletal muscle is non-branching and can be identified by peripheral nuclei. The large white vertical lines are knife marks from sectioning (artifact).Bar = 250 Micron


Cardiac Muscle
This photomicrograph of the same tissue taken in phase
shows the striations and intercalated disks
(arrows) more clearly.
Bar =30 Micron
Nervous Tissue

Practical No.6
Identification of different stages of mitosis and meiosis using microscopic slides .
Objectives
- Identifies the major stages of cells in the process of mitosis and meiosis.
- Differntiates the behavior of chromosomes during the two types of cell division.
Materials and Equipments
- Student microscope
- LS onion root tips for study of mitosis
- TS anther for study of meiosis
Instructions
- Let students observe each of the slides under low, medium and high powers of the microscope respectively.
- Ask them to identify the cells which show the main stages of mitosis and meiosis using the positions and shapes of the chromosomes.
- Direct students to draw the observed stages of mitosis and meiosis in correct sequence.
- Direct students to identify ,carefully the various positions and shapes of the chromosomes and the changes that take place.
- Instruct the students to record highlighting the changes that occur in the nucleus and centrioles of cells undrrgoing mitosis and meiosis.


http://www.funsci.com/fun3_en/mitosis/garlic.htm#top
http://www.youtube.com/watch?feature=player_detailpage&v=oTfgDgwV93Y

No comments:
Post a Comment